How to use Form Assembly with Salesforce – Top Ten Tips
FormAssembly is a widely used application to connect web forms to Salesforce. There are some great posts out there already including ‘why formassembly may be a better choice than Salesforce web to lead‘ and we wanted to add this blog as a resource for everyone using FormAssembly with Salesforce.
As well as having great functionality to integrate your forms with Salesforce, they have a very responsive helpdesk. FormAssembly can be used as a completely stand-alone product – and that’s worth knowing, once you have the subscription, there are a myriad of uses that could save you web development budget. For example, if you want to conduct a quick competition or data capture exercise and simply import data to Salesforce (or don’t require it in Salesforce), you can build your FormAssembly form without any Salesforce connection and simply download the responses afterwards.
If you do want to integrate your form to Salesforce, here’s our Top 10 Tips on how to use it:
1. Use the same email address for FormAssembly as the Salesforce User you’ll connect with
This sounds like such a simple thing but if you’re using FormAssembly and Salesforce you need to use the same User Name for your FormAssembly login as the specific user you want to connect to Salesforce with. You also need to choose an email address that you can actually receive emails to as you may need this during the testing phase.
2. Choose your Form Assembly subscription level, ideally the Premier Edition or above
Many of my clients are on the lowest level (Professional Edition) but there are several reasons you’ll want to be on the Premier Edition if you can afford it:
- Salesforce Prefill is only available from the Premier Edition upwards – at its most basic level, this means that if you have a dropdown menu in your form (‘picklist’ in Salesforce/US terminology) then at the Professional Edition level you will need to maintain the options in both Form Assembly and Salesforce – this is very time consuming. At the Premier Edition, you can just point Form Assembly at the field in Salesforce and it can show all active values in the menu. As an example, one of our clients uses Formassembly for Job Applications and at the lower level (Professional Edition), they will have to manage a vacancy list in Salesforce and Form Assembly (and ensure they match exactly or the form could fail)
- E-signatures are available in the Premier Edition of Form Assembly so if you require this feature you’ll need to subscribe at that level
| FormAssembly key Salesforce features as at Oct 2019 |
Professional Edition |
Premier Edition and above |
| Salesforce Prefill |
No |
Yes |
| E-Signatures |
No |
Yes |
| Authorize.Net, CyberSource Integrations |
No |
Yes |
| Salesforce Marketing Cloud Integration |
No |
Yes |
| Personalized Welcome Call |
No |
Yes |
3. Work out how your form is going to connect to Salesforce
We all just want to login, start on a form and produce a finished form – and the amazing thing about FormAssembly is that is possible, as you’re working on the form, there is a ‘Publish’ link constantly available that you can send to people who can simply refresh the link to see your progress. However, it’s a good idea to have a think about how your form will connect with Salesforce as you might change your form approach at that point.
Here’s a few questions to ask:
– do you want Form Assembly to connect to existing records in Salesforce or are you happy that it will create a new contact record (and associated objects) for the entry? If you do want it to Lookup existing Salesforce records think about what fields you’ll need for that and ideally add these at the start of the form, e.g. First Name, Last Name, Postcode, Email address
– are you happy with the lookup above – or would you prefer that you update or add records to specific records in Salesforce. For example, if customers are completing a form to tell you how they feel about your services, you really want that information to be definitely held on the right record (and not on a duplicate in Salesforce) – you can do this with custom URLs that are embedded in Salesforce (e.g. using a Formula field) and then these fields can be referenced in emails sent out from Salesforce. I think this is ever more important as I’m noticing that B2C and B2B customers are increasingly using multiple email addresses in their correspondence, even in a short time frame
– the custom URL method ensures the right information is stored on the right record – but it does mean extra Salesforce fields and bespoke links per contact which means you have to use an email system that includes these merge fields. For small volumes the List Email functionality in Salesforce works well. If you are creating a formula field for your custom URL in Salesforce, don’t forget that it can take a few hours to propagate across your Salesforce records
– what Salesforce connector will you use on the Timeline. In the Connectors page, click the add link and choose the connector you’d like to configure. Each step of the connector represents a different stage of processing: Form Opened, Form Progress Saved, Form Submitted, or After Form Submitted. With the Premier Plan or Enterprise edition of FormAssembly, you can choose a prefilling connector for the Open stage. If you would not like to have your respondents see connector errors, place the connector in the Post-Submit phase of the connector – the downside of this method is that you’ll have to review the errors and resubmit the forms. Read more about the connector timeline
4. Conduct a test with just a few fields
It’s a good idea to try a test submission with just a few fields in place on the different objects you’ll be using – for example, the linking method (whether custom URLs or Lookup), and handful of survey form fields from a few objects that you’re writing back to. This increases confidence in the method as well as highlighting any immediate issues with the form.
5. Check your duplicate rules aren’t going to prevent Form Assembly submissions
Your Salesforce duplicate rules could prevent the submission of your Salesforce forms so you may have to amend these (or deactivate them) in Salesforce in order to allow submissions. There may be other ways around this too – for example, getting your duplicate rules not to fire for FormAssembly but to fire in other circumstances.
If you see an error such as ” 1. Create Contact – You’re creating a duplicate record. We recommend you use an existing record instead” then it’s likely you need to switch off your duplicate rules in Salesforce in order to allow your FormAssembly forms to continue working. Alternatively create a rule to ensure that the Duplicate Rules don’t apply to the FormAssembly User, e.g. in Setup add a condition which specifies that the Current User Profile is not equal to System Administrator. Or you could try using a FormAssembly Lookup by Email address (if that’s what your duplicate rules are based on) in order to ensure the rules won’t affect submissions.
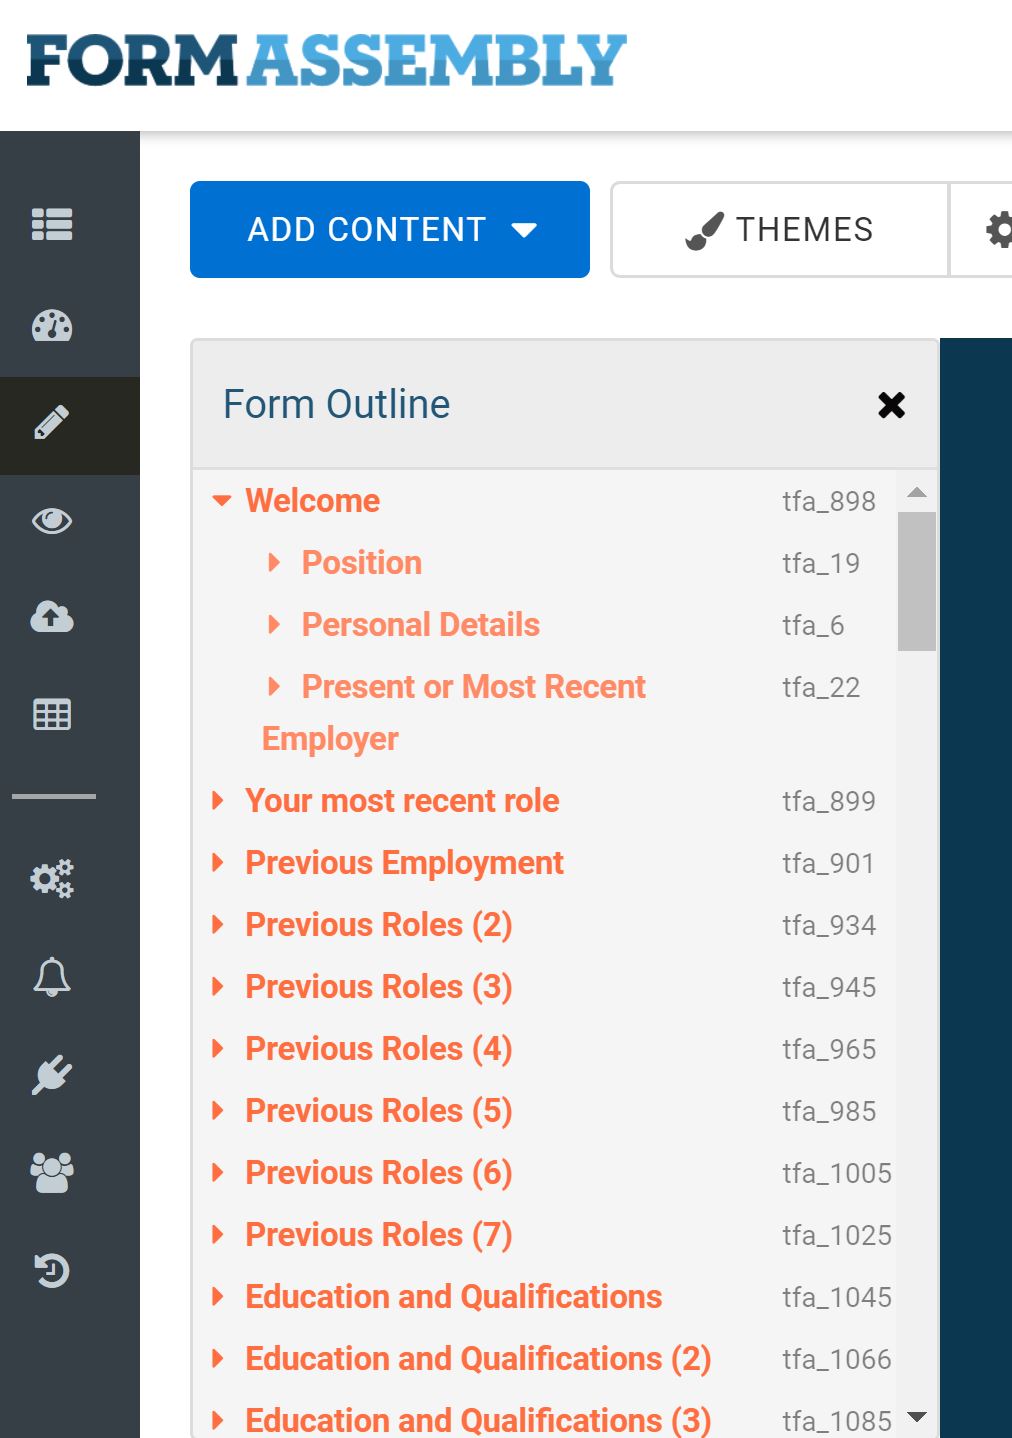
6. Name Questions, Pages and Sections sensibly
When a new page appears, it’s easy to want to delete ‘Page 2’ if that doesn’t fit with your style, but try to rename it to something that makes sense to you – it will be so much easier to review the Outline in FormAssembly if you have clearly named page numbers.
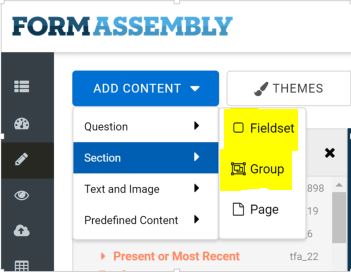
For questions that naturally group together, use a Fieldset or Group in FormAssembly.

Fieldsets and Groups are very similar – a Group is an invisible way to group multiple elements, whereas a Fieldset visually groups them too with a border and title. If you’ve created them as a Group and want to make it visual, you can still add a border to it retrospectively.
When you write questions, try to avoid them all starting with the same words as this is much more difficult to work with in the Salesforce Connector – e.g. if every question starts with “Which of the following” it will be hard to work out which is which when you’re in the connector. Try instead to get what’s unique about your question into the wording sooner, e.g. “Which flavours of ice cream”, instead of “Which of the following flavours..”. However a very recent update to FormAssembly has improved the connection screen considerably, so once chosen you get to see the full question wording against the Salesforce variable whereas before it was truncated at all times.
7. Ensure every question in Form Assembly has the Correct Validation for Salesforce
FormAssembly forms will error if any field in your survey doesn’t match exactly to the Salesforce field. For that reason, you’ll need to put validation rules on every field in the survey, so that when it does error, the respondent knows exactly what to fix. For example, if you include an email address in your survey – you do this using a ‘Text Input’ field in Form Assembly, the choosing ‘Email’ from the expected format drop down and then ensure you put a limit of 80 characters on it as that’s the Salesforce field limit for email. Incidentally, setting your ‘Expected Input’ on the Text Field to Email is how your ‘Notification’ area of formassembly will know an email address can be used for the auto-responder.

Yes, this is a lengthy part of the process, particularly for long or complex forms. To make this process quicker, here’s some of the most commonly used Salesforce fields and their character limit – in FormAssembly, on each question, make sure you click Options / Validation and set “Limit length of answer” to the relevant values from below or your custom field.
- Email Address – Text Input, Expected Input = Email, Limit Length of Answer = 80 characters
- First Name: 40 characters (for Contacts and Leads)
- Last Name: 80 characters (for Contacts and Leads)
- Phone number: 40 characters
- Mobile: 40 characters
- Mailing Street: 255 characters
- Mailing City: 40 characters
- Mailing Country: 80 characters
- Mailing State/Province (county): 80 characters
- Mailing Zip / Postal Code (postcode): 20 characters
- Title: 128 characters
- Account Name: 255 characters
- Opportunity Name: 120 characters
- Campaign Name: 80 characters
- Contract Name: 80 characters
- Custom Object Name field (if not using Auto Number): 80 characters
- Text or Text Area field: 255 characters (approximately 50 words)
- Text Area (Long): up to 131,072 characters (but try to put a shorter limit on each Long Text field you create and use the same limit on the question in FormAssembly)
Note: you can’t use Long Text Salesforce fields in any formulas in Salesforce so if you are creating custom fields to be a home for your FormAssembly data, try to use the Text Area field which has a 255 character limit. This is a known Salesforce issue that has been a longstanding idea for improvement so it’s worth avoiding Long Text fields if you can. A 255 character limit is roughly 50 words so there may be many times you do need to use Long Text fields – in this case set a more reasonable character limit in Salesforce (on a Long Text field) and on FormAssembly. I find 3000 characters is a good limit for allowing sufficient space in open survey responses without being too cumbersome in Salesforce.

8. Create the Salesforce connections in the same order as the Survey
I have a few frustrations with the FormAssembly Connector interface:
- You can’t easily check that every form is connected to Salesforce. This is because it allows you to send the form data to more than one place in Salesforce which is fantastic, but you never get a view of which questions are remaining to connect.
- You can’t re-order the connected fields so if your survey has changed a lot, or you’ve done various versions, your connected fields can look jumbled compared to your survey
These two issues combined with the inability of FormAssembly to create a PDF of the whole form make it really difficult to check you have a fully connected form to Salesforce – this is really easy if there are 10 fields on your form, but harder if there are 40+ across multiple pages.
So once your tests have been completed, ideally do all your FormAssembly to Salesforce connections in the same order as the form – at least then, you can work across two screens with the form in one and the connector in another and read off each question to check that it is passing to Salesforce. I prefer to have all the techy type fields at the top – e.g. if you’re passing Contact ID, a ‘created by Form Assembly field’, ‘Lead Source’ etc.
9. Use a ‘Created by FormAssembly’ field in Salesforce on every object
Create a field in Salesforce that is a ‘Created by FormAssembly’ checkbox on every object, e.g. Contact, Opportunity etc. Then create a Text Input field in FormAssembly with a default value of True and connect the two – this will ensure you can trace what FormAssembly has created. You may want to take this much further with passing the Form Name or other details into the record – sending the form name through to Salesforce is particularly important if you have many different form types going into the same object or record types.
 10. Ensure the Values passed from FormAsssembly match Salesforce, e.g. keep Dropdown menus the same
There isn’t a magic process behind the scenes that checks the FormAssembly values being passed to Salesforce match – the onus is on you as the FormAssembly user to make sure that your connections are all up to date, otherwise it may fail. It’s normally impossible to do test submissions for every combination of answers, so spend quite a bit of time on the Connector page to make sure all the fields are correct – use the ‘Get New Salesforce’ button before you review or edit the Connector page, as that will pick up new fields in Salesforce and avoid you missing any when you’re working on it.

And finally (yes this is step 11) Test, Test, Test
I just couldn’t fit this list to ‘Top 10’ as this final step is arguably the most important. Test, test, test – every time you do a change to the connector, or to a dropdown menu, or use a different type of URL to push values into your FormAssembly forms conduct tests. You can review the responses in FormAssembly to see why any failed – and resubmit them which is a good feature.
The reason I like to have all the most important/techy fields up front (e.g. Contact ID, Record Type ID, values you’re passing through the URL) is that just getting past page 1 means you pass a lot of the tests so you can identify problems early. Using keyboard shortcuts like Control, Space and down arrow might help you do test submissions a bit quicker during your testing.
Be Aware of the Limitations
It is important to be aware of FormAssembly’s limitations – for example, it can’t currently pass a rich text field into Salesforce. As at Oct 2019 I asked for a couple of clarifications on this from the helpful FormAssembly team – here’s a summary of their answers:
– “Currently, rich text fields are not supported as mentioned in our help doc: https://help.formassembly.com/
– on the Review before Submit page, there is no formatting shown (not even line breaks) – this is a known issue and not likely to be solved in 2019
Frequently asked questions & Troubleshooting
I’ve added this section to include answers to questions I come across regularly – hopefully this will help you too. A big thanks to the lovely team at FormAssembly for always being friendly and helpful in trying to solve the more complicated FAQs in this section.
- Can you copy and paste questions in Form Assembly from one form to another? Yes, you can use Form Assembly’s Predefined Content feature to “save” fields or field sets to be used in other forms
- How do I limit respondents to choosing a maximum number of tick boxes? Read our blog post on this.
- What does “Is not a valid value for the type xsd:double” error mean? I hit upon an error “Is not a valid value for the type xsd:double” which has a useful Form Assembly article explaining it’s caused by trying to send a non-number value to a Salesforce number field. In my case, I had a rating of 1 to 10 which I’d actually mapped twice – and it tried to send both values across “10 10”. If this happens to you, it’s a simple fix to delete the repeated mapping
- Is Form Name ever seen publicly? Although the Form Assembly documentation mentions that Form Name is only for internal use, I noticed it does appear to the respondent in the browser tab and also in the reply email if you have activated Save & Resume so it’s worth keeping these neat and tidy (and not too laden with internal references)
- What happens when I delete a question in Form Assembly? When you export responses, you’ll see that deleted field with a blank label (you can untick it to remove it from the export) or you may use the “Remove All Columns” option, click OK, then the response report page will refresh with all [deleted question] columns hidden. Then when you click “Add All Columns”, the response report page will refresh with the deleted fields no longer displaying. Deleted fields are not carried over to cloned forms. The upshot? It’s a good clean process but back up your data before deleting questions if you’d like historic access.
- Can I add an image to Form Assembly email confirmations? Form Assembly’s support response is that you can use the <img src=””> HTML tag. The snag here is that you’ll need to be hosting your file somewhere – for example on your own website. Form Assembly also mentioned some clients create a form with just an image in it and reference that in the email confirmations but we haven’t tested this solution and it’s not one that is supported.
- How do I allow respondents to attach a document in a FormAssembly form to send to a File in Salesforce Lightning? Read our blog post on how to do this.
- What Expected Input Format should be used for websites? Form assembly mentioned that they don’t have a ‘website’ option for validation rules. If you want to validate a URL input then you will need to select “Custom” and use a regular expression. The helpful team at FormAssembly tested the following expression which worked in their tests – but it required the website to have a www prefix. The expression was sourced from this stackoverflow discussion which has other options to use. /((([A-Za-z]{3,9}:(?:\/\/)?)(?:[-;:&=\+\$,\w]+@)?[A-Za-z0-9.-]+|(?:www.|[-;:&=\+\$,\w]+@)[A-Za-z0-9.-]+)((?:\/[\+~%\/.\w-_]*)?\??(?:[-\+=&;%@.\w_]*)#?(?:[\w]*))?)/
- Can I link to a Salesforce Opportunity in our FormAssembly notifications? Yes, the following link can be used in the notifications to append the Opportunity ID onto the URL. You will need to replace na136.lightning.force.
com with your Salesforce instance URL:
https://na136.lightning.force.com/lightning/r/Opportunity/@ LEFT(%%SFA_OPPORTUNITY%%,18)/ view - How do you route FormAssembly respondents to a ‘Thank & Close’ page based on screening questions? You could make this a multiple form setup – there would be three forms in total: the first form would be screening questions with a ‘Next Page’ button. This form would have a Redirect formula which would be based on the choice the respondent makes. The formula would look like the example below:
@IF(%%tfa_34%%=”No”,”http://google.com“,@IF(%%tfa_34%%=” Yes”,”http://msn.com“,”http:// yahoo.com“)). The second form would be the one respondents would reach if they are not a suitable respondent – the text on the form would say they are not suitable and custom CSS on this article would be used to hide the submit button. The third form would be the one respondents would reach if they do meet the criteria. - How could I filter respondents out of a FormAssembly form without using a multiple form set up? If you wanted to just use a single form, the simplest option would be to setup conditional fields, or pages to the form based on the choice the respondent makes. They would be able to submit the response, as there is not a way to conditionally hide the Submit button only for a particular group, but you can set a Skip-If formula on the connector to skip the connector if they don’t meet the criteria.
- What Input validation should I use for phone numbers in FormAssembly? If you wish to have a field that would only accept numbers of any length and allow a leading zero, you may use Number validation. However if you have a specific phone number format in mind such as xxx-xxx-xxxx, you may consider using auto-format with a mask. You could also add contextual hints that may serve as an extra guide to your respondents on the format you want them to enter for the phone number field.
- How can I change the validation error messages that are being shown to respondents? You can customise the error message if you create your own validation rule
- We are getting duplicate form submissions that the respondents don’t recognise, why is this? Where respondents leave the Thank You page open in their browser, the next time their browser refreshes, it will resubmit the response again causing a duplicate response. Unfortunately this is all entirely dependent on the respondent and their browser, so you cannot do much to prevent this except for physically redirecting respondents away from the Thank You page. You can redirect respondents to your website or if you would like to keep the current thank you message, you can create a second form to redirect to and place your thank you message on this second form and hide the submit button using the custom code below. This will make it seem to your respondents as if they are just viewing your Thank You page and not another form and also help prevent duplicate responses from being accidentally submitted.
<style>

input.primaryAction {

display: none;

}
What are your tips for using FormAssembly? I hope this has covered the main tips for using FormAssembly – what are your tips?
0 Comments on "How to use Form Assembly with Salesforce – Top Ten Tips"